Challenges of Digital Drives: File Recovery in Practice Without Expensive Tools [ Final Part ]
![Challenges of Digital Drives: File Recovery in Practice Without Expensive Tools [ Final Part ]](https://threat.boutique/content/images/20250322122646-Forensic.webp)
Background: In the previous article, we discussed how files are stored inside drives and highlighted the essential metrics to consider after acquiring the storage footprint. Now, we will dive deeper into the techniques for recovering files, specifically focusing on how to recover a file that has been removed. Using the example of a JPG file, we will demonstrate the step-by-step process to recover it, ensuring forensic integrity throughout the procedure.
Steps:
- Acquire RAW image
- Prepare file header static information
- Prepare hex editor
- Recover file
- Acquire RAW image In this section, for testing purposes, we will use two images of a USB drive. The first image contains a JPEG file, along with the raw hash of the USB drive. The second image is of the same USB drive but with the JPEG file removed. This setup will allow us to demonstrate the file recovery process and compare the integrity of the data before and after the file removal.
SHA 256 is 791d99da08dc9a8c2269409a29d9ca2cf516a25fae340089906bfc4ea5779898

On the second image, it contains the raw hash of the USB drive from which the previous JPEG file was removed. This allows us to analyze the changes in the drive's data structure and demonstrate the recovery process of the deleted file.
SHA 256 is 095bd2bd3ece2752ed0ef98119f8f242ea81eb79819da14fb7e4b89cc7bbc143

We will use the dd command to capture the raw data of the USB drive, ensuring a bit-by-bit copy for forensic analysis. This method provides an exact replica of the drive's contents, allowing us to work with the raw data for file recovery and integrity verification.
Prepare file header static information:
Before conducting any search, let’s dive deeper into data headers and footers. Every file contains a unique header and footer, which mark the start and end of the file, respectively, when viewed in hexadecimal. These identifiers are critical for file recovery. We will use resources technical references to gather the necessary header and footer information for the file type we are targeting, such as JPEG. This knowledge will help us identify and reconstruct the file from raw data.
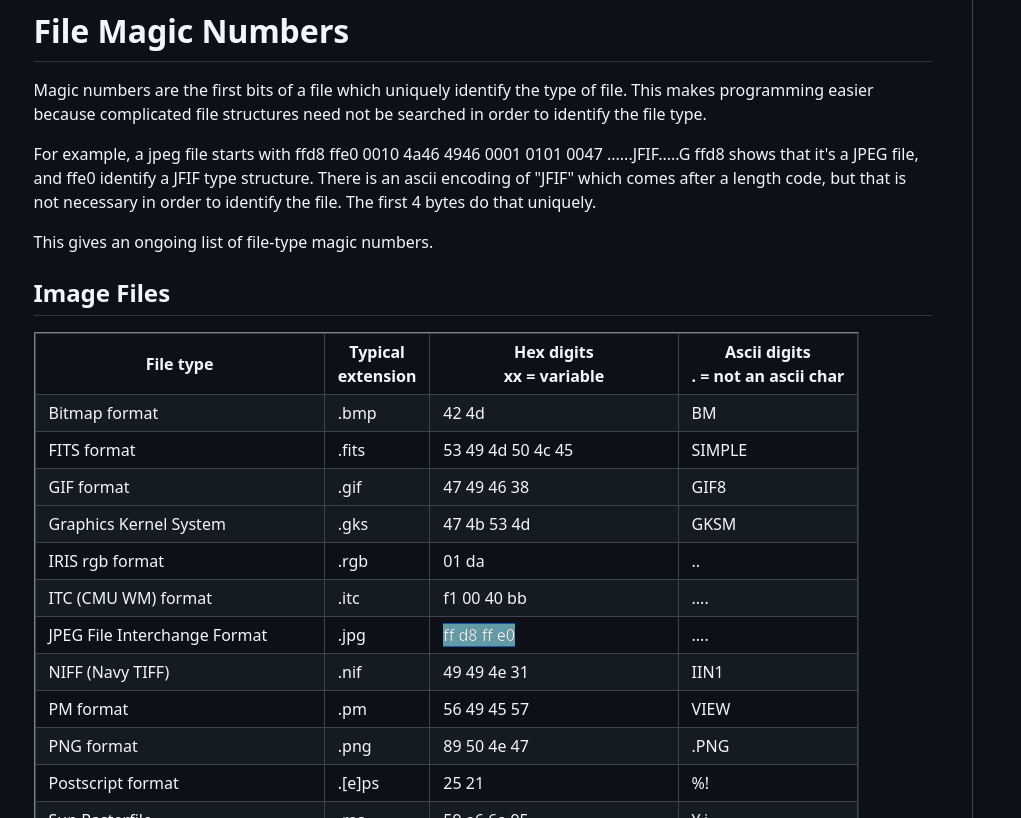
From the list of file signatures, we can determine that a JPEG file’s magic header typically starts with the hexadecimal sequence FF D8 FF E0 and can also end with FF D9 (which is the standard JPEG footer). Some JPEG files may also use FF D8 FF E1 as part of their header structure, depending on the encoding.
Prepare hex editor and recover file:
In the first image, where the file has not been removed, we can see the JPEG file clearly present in the hexadecimal view. The file's magic header (FF D8 FF E0) e. This provides a reference for comparison when analyzing the second image, where the file has been removed.

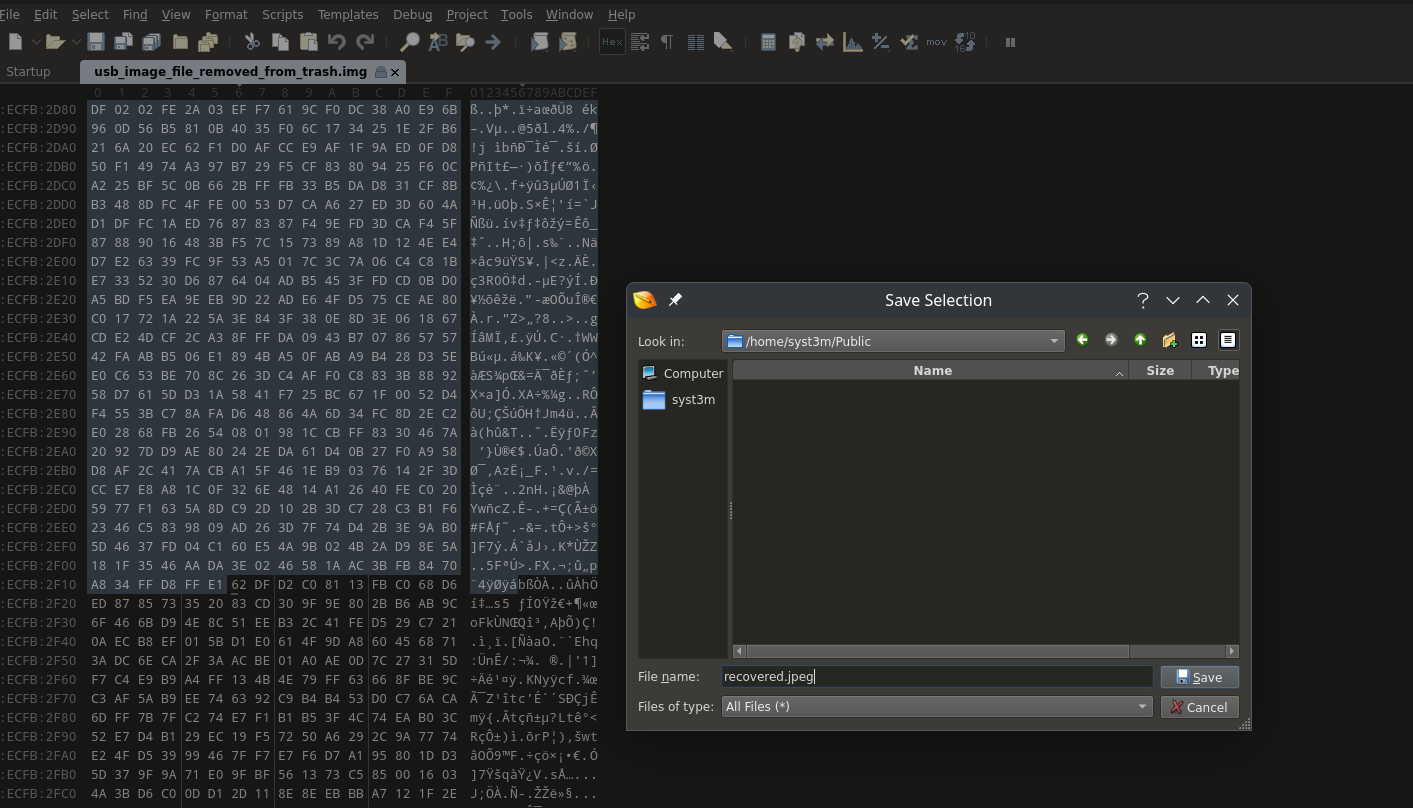
Let’s imagine that a threat actor removed the image from the storage. After acquiring the raw storage data, we examine it using a hex editor. In the hexadecimal view, we can see that the image still exists, as its magic header (FF D8 FF E0) remain intact in the raw data. However, on the operating system's user interface (UI), the file will no longer be visible because the file system metadata marking its presence has been altered or deleted. This demonstrates how files can persist in raw storage even after being "removed" from the OS perspective, highlighting the importance of forensic analysis at the hexadecimal level.


After identifying the range of the JPEG file in the hexadecimal view—starting from the header magic number (FF D8 FF E0) and ending at the footer magic number (FF D9)—we can select this range and export it as a standalone file. By saving this extracted data with a .jpeg extension, we effectively recover the deleted image, even though it was no longer visible in the operating system's UI. This process demonstrates how raw data analysis can be used to reconstruct and recover files directly from storage.

Conclusion: For Incident Response (IR) specialists, understanding the intricacies of file storage and recovery is crucial when dealing with compromised systems. As demonstrated in this article, even when a file appears to be removed from the operating system's UI, it often persists in the raw storage data. By leveraging tools like a hex editor and analyzing hexadecimal views, IR teams can recover critical evidence, such as deleted JPEG files, without relying on expensive forensic tools.
This approach not only highlights the importance of examining raw data but also underscores the need for a deep understanding of file signatures, headers, and footers.